Flutter for Android Developers: Integrating Native Code into Your Apps


Flutter has quickly become one of the most popular cross-platform mobile development frameworks, offering a fast and expressive way to build beautiful apps for both iOS and Android. However, despite its many benefits, there may be times when you need to write native code for your Android app to take advantage of specific platform features or performance optimizations. In this blog, we'll explore how you can integrate native Android code into your Flutter projects, unlocking a whole new world of possibilities for your mobile development. Whether you're a seasoned Android developer or just starting, this guide will give you the tools and insights you need to build high-quality, feature-rich apps with Flutter and native Android code.
Now to use android platform-specific APIs inside our android app we have to write custom platform-specific code. Before diving deep into the process, first, let's understand how it works.
Every Flutter application has two portions,
Flutter or Dart Portion
Non-Dart Portion or Platform
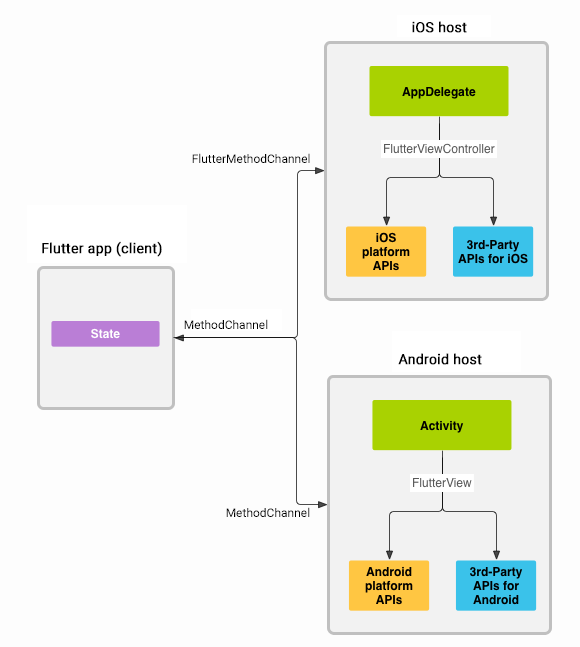
Now we are taking the Flutter portion or the UI portion of our app as the Client and the Non-Dart or Platform portion of our app as the Host. Now the data between the Host and Client is shared by a platform channel as shown below,
Here in this blog, we are going to explore how to write Android-Platform-specific code inside our app.
So Hey developers, Let's Get Started...🏃🏃🏃
Our Aim:-
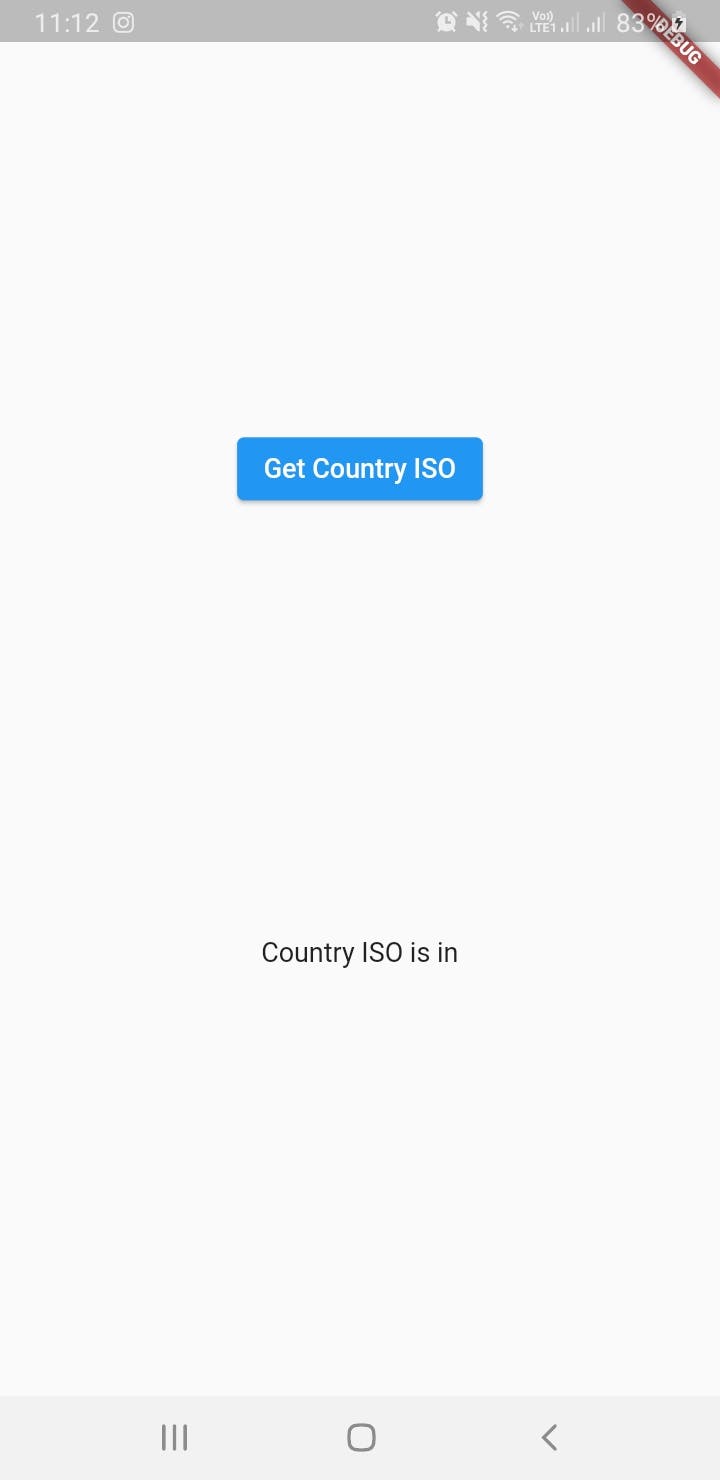
We aim to create an app where we can fetch the country-ISO code from any SIM card of an android device. For this, we will use native android code but the question is how to integrate that with our flutter application. Our app will look like that,
So let's get started,
Step 1:-
First, Let's make the UI of our app in flutter. Let's create a dart file named sim_iso_page.dart and put all the necessary code inside the file.
import 'package:flutter/cupertino.dart';
import 'package:flutter/material.dart';
import 'package:flutter/services.dart';

class DummyPage extends StatefulWidget{
  @override
  State<DummyPage> createState() => _DummyPageState();
}

class _DummyPageState extends State<DummyPage> {
  String _countryIso = 'Unknown country iso code.';

  @override
  Widget build(BuildContext context) {
    return Material(
      child: Center(
        child: Column(
          mainAxisAlignment: MainAxisAlignment.spaceEvenly,
          children: [
            ElevatedButton(
              onPressed: _getCountryIso,
              child: const Text('Get Country ISO'),
            ),
            Text(_countryIso),
          ],
        ),
      ),
    );
  }
}
Here we have made a stateful widget named DummyPage and made all the necessary UI designs with dart code. We have also taken a state named _countryIso which will be responsible to update the Text() with necessary data.
Now let's make a common channel in Flutter to listen to the native platform channel output. Here is the channel,
static const platform = MethodChannel('sitam.theDIRone.dev/iso');
 Future<void> _getCountryIso() async {
    String countryIso;
    try {
      final String result = await       platform.invokeMethod('getCountryIso');
      countryIso = 'Country ISO is $result';
    } on PlatformException catch (e) {
      countryIso = "Failed to get Country ISO: '${e.message}'.";
    }

    setState(() {
      _countryIso = countryIso;
    });
  }
There always should be a unique name for every specific channel and as per the naming convention, the prefix of the name should be like a domain name. Inside try{} block we will invoke the getCountryIso() method written in native android code and if there comes any error at the time of getting data then the error should be caught by catch{} block.
Now, Put the channel inside the _DummyPageState class. The final code will look like that,
import 'package:flutter/cupertino.dart';
import 'package:flutter/material.dart';
import 'package:flutter/services.dart';

class DummyPage extends StatefulWidget{
  @override
  State<DummyPage> createState() => _DummyPageState();
}

class _DummyPageState extends State<DummyPage> {
  static const platform = MethodChannel('sitam.theDIRone.dev/iso');
  String _countryIso = 'Unknown country iso code.';

  @override
  Widget build(BuildContext context) {
    return Material(
      child: Center(
        child: Column(
          mainAxisAlignment: MainAxisAlignment.spaceEvenly,
          children: [
            ElevatedButton(
              onPressed: _getCountryIso,
              child: const Text('Get Country ISO'),
            ),
            Text(_countryIso),
          ],
        ),
      ),
    );
  }

  Future<void> _getCountryIso() async {
    String countryIso;
    try {
      final String result = await platform.invokeMethod('getCountryIso');
      countryIso = 'Country ISO is $result';
    } on PlatformException catch (e) {
      countryIso = "Failed to get Country ISO: '${e.message}'.";
    }

    setState(() {
      _countryIso = countryIso;
    });
  }
}
Step 2:-
Now let's see how to write our native android code inside flutter app.
First, open the MainActivity.kt file inside kotlin package of the android section of our project and put the code written below,
import io.flutter.embedding.android.FlutterActivity
import android.telephony.TelephonyManager
import android.content.Context
import android.content.ContextWrapper
import android.content.Intent
import android.content.IntentFilter
import android.os.BatteryManager
import android.os.Build.VERSION
import android.os.Build.VERSION_CODES
import androidx.annotation.NonNull
import io.flutter.embedding.engine.FlutterEngine
import io.flutter.plugin.common.MethodChannel

class MainActivity: FlutterActivity() {
  private val CHANNEL = "sitam.theDIRone.dev/iso"
  override fun configureFlutterEngine(@NonNull flutterEngine: FlutterEngine) {
    super.configureFlutterEngine(flutterEngine)
    MethodChannel(flutterEngine.dartExecutor.binaryMessenger, CHANNEL).setMethodCallHandler {
        call, result ->
      // This method is invoked on the main thread.
      // TODO
      if (call.method == "getCountryIso") {
        val countyIso = getCountryIso()

        if (countyIso != "") {
          result.success(countyIso)
        } else {
          result.error("UNAVAILABLE", "Not able to fetch country code", null)
        }
      } else {
        result.notImplemented()
      }
    }
  }

  private fun getCountryIso(): String {
    val telephonyManager = this.getSystemService(Context.TELEPHONY_SERVICE) as TelephonyManager

    return "${telephonyManager.simCountryIso}"
  }
}
Here let me explain the code,
First of all, we have put the same channel name as we mentioned in the flutter section of our app and pass the channel name to the method named MethodChannel(). Then inside getCountryIso() method, we have invoked TelephonyManager.simCountryIso method to fetch the country ISO code from the SIM card. Then we invoked the getCountryIso() method inside MethodChannel().setMethodCallHandler{} callback after checking if the called-method from the flutter portion's channel is equivalent to "getCountryIso".
if (call.method == "getCountryIso") {
// After checking we are invoking the method here
        val countyIso = getCountryIso()

        if (countyIso != "") {
// passing the success result into the channel which will be listened and fetched by flutter portion's channel.if (call.method == "getCountryIso") {
        val countyIso = getCountryIso()

        if (countyIso != "") {
          result.success(countyIso)
        } else {
          result.error("UNAVAILABLE", "Not able to fetch country code", null)
        }
      } else {
        result.notImplemented()
      }
          result.success(countyIso)
        } else {
          result.error("UNAVAILABLE", "Not able to fetch country code", null)
        }
      } else {
        result.notImplemented()
      }
P.S: When you will write your native android code try to open the particular android portion from the flutter app project folder inside the android studio. Then android studio will provide all the necessary suggestions to write the native kotlin or java code as same as native android app development. Otherwise, if you write native code directly from the flutter app folder, then suggestions will not be shown and your native code may become more error-prone.
So yeah finally we have successfully built our flutter application with native android code.
Thank you for reading the blog. Hopefully, you have learned something new and enjoyed my explanation.